
Adjusting the fan speed on your OPS 07 or OPS 10 can help you balance cooling performance and noise levels. This guide is for IT admins or advanced users who need to reduce fan noise or increase cooling for demanding environments. If your OPS is overheating or making excessive noise, these steps may help. If you are not comfortable entering BIOS settings, or if your OPS is not an OPS 07 or OPS 10, do not use this guide—contact your IT support or i3CONNECT support team instead.
By the end of these instructions, you’ll be able to set the fan speed to your preference. If you cannot access the BIOS or the fan speed does not change, please contact support.
Before you start
-
You’ll need a USB keyboard (touchscreen input does not work in BIOS).
-
Make sure you are working with an OPS 07 or OPS 10.
Instructions
-
Connect a USB keyboard to one of the OPS’s USB ports.
-
Power on the OPS. As soon as you hear the boot beep, quickly press the DEL key several times. If DEL does not work, try F2 or F10—the correct key may vary.
-
Enter the BIOS settings menu.
-
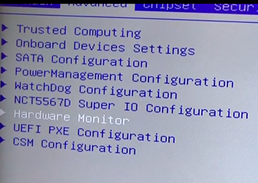
Navigate to Advanced settings and select Hardware Monitor.
-
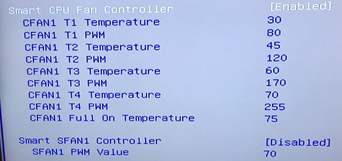
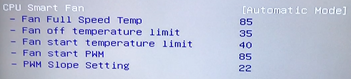
Enable the Smart CPU Fan Controller. The option name may differ slightly depending on your OPS model, but it will be similar.
-
Return to the main menu by pressing ESC.
-
Go to Save and Exit and confirm to save your changes. The OPS will reboot with the new fan settings.
Video instructions
Troubleshooting
-
If you cannot enter the BIOS, double-check your keyboard connection and try different keys (DEL, F2, F10) during startup.
-
If the fan speed does not change, ensure you saved the settings before exiting BIOS.
-
If you experience overheating or persistent noise after adjustment, revert to default settings or contact support.
Labels
how-to, ops-07, ops-10, hardware-settings
/Fabricated: The introduction, before you start, troubleshooting, and labels sections were added for clarity and completeness. The rest is based on your original content./