
Learn more about where to find this tool here:
Screenshot menu (bottom right)
Whilst in the annotation tool, on the bottom right side of the screen you should see a menu (shown below in the image). This menu can be consists of 4 buttons:
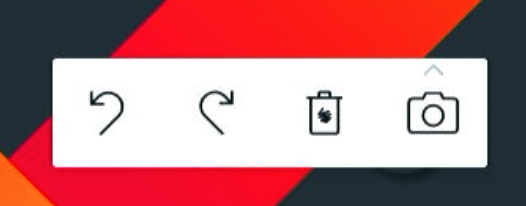

Undo and redo
-
Use the “Undo” button to undo the previous action on the canvas.
-
Press the “Redo” button to redo the last undone action on the canvas.
The Undo queue works while you keep working on the document. When you open a new document, it’ll be cleared.
Taking a screenshot
Taking a screenshot can be done by selecting the camera icon in the bottom right corner of the screen. You are given two options:
-
Fullscreen capture - The left option allows you to capture the entire screen
-
Select an area to capture - The right option allows you to use your fingers to select an area of the screen to capture
The fullscreen options will immediately take a screenshot of the entire screen and export your annotations to i3WHITEBOARD.
The capture area mode (shown above) will allow you to select the area you want to capture.
Screenshots in the whiteboard
To open i3WHITEBOARD immediately, select the i3WHITEBOARD icon at the top of the Main menu:

Your screen captures will be added in the last i3WHITEBOARD workspace if one is already open. Otherwise, a new workspace will be created.
The screenshot is added to a page in i3WHITEBOARD. If you created more than one annotation, open the Pages menu at the bottom right of the screen. Each annotation screenshot is saved to a separate page within the board.