
Write System FW without a remote control - Troubleshooting on Elm 2
Do not interrupt the firmware upgrade process in any way:
-
Do not touch the display (due to potential touch recalibration)
-
Do not disconnect the display from power
-
Do not remove / pull out the USB drive
An improper or incomplete upgrade can cause unexpected behavior and could permanently damage your device which will require repair by an i3CONNECT authorized service center. Please perform the update procedure by following exactly the instructions below but when coming across any issue, do not continue upgrading other screens and contact our support team. After the update, the display settings will be reset to factory default.
Prerequisites
-
USB 2.0 flash drive >= 8GB Formatted to FAT32 (we recommend a SanDisk brand).
-
The correct firmware file
|
Display |
Firmware v1.1.1 |
Firmware v1.1.2 |
Firmware v1.2.0 |
Firmware v1.3.0
|
Firmware v1.3.2 |
Firmware v1.9.0 |
Firmware v2.0.0 |
|---|---|---|---|---|---|---|---|
|
Elm2 - 65” / 75” / 86” |
OTA only |
OTA only |
a) unzip the downloaded file on your harddrive.
b) copy paste the extracted folder upgrade_3576 with all content in the root of the USB flash drive. Do not change the name of the folder nor alter, delete, add files.
Instructions
To force the firmware update via the prepared USB flash drive, follow the procedure below.
-
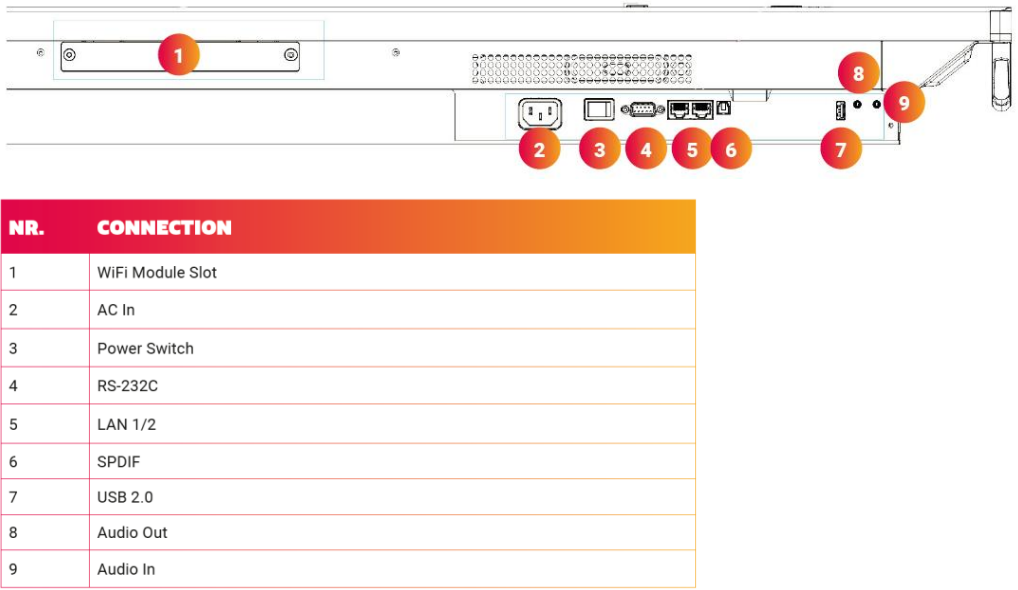
Switch off the display by switching the Power Switch (3) or pulling the power cord.
> The switch is located next to the power cable, at the bottom side of the display. -
Insert the USB flash drive in the USB 2.0 port (7) on the bottom side of the screen.
-
Press and hold the Power Button (2), located on the front side of the display, while switching on the Power Switch (3) at the bottom side (or connecting the power cable when it is pulled).
-
Keep the Power Button (2) pressed for about 10 seconds, until you see the power LED light flashing.
> After the LED starts flashing, release the Power Button (2) again.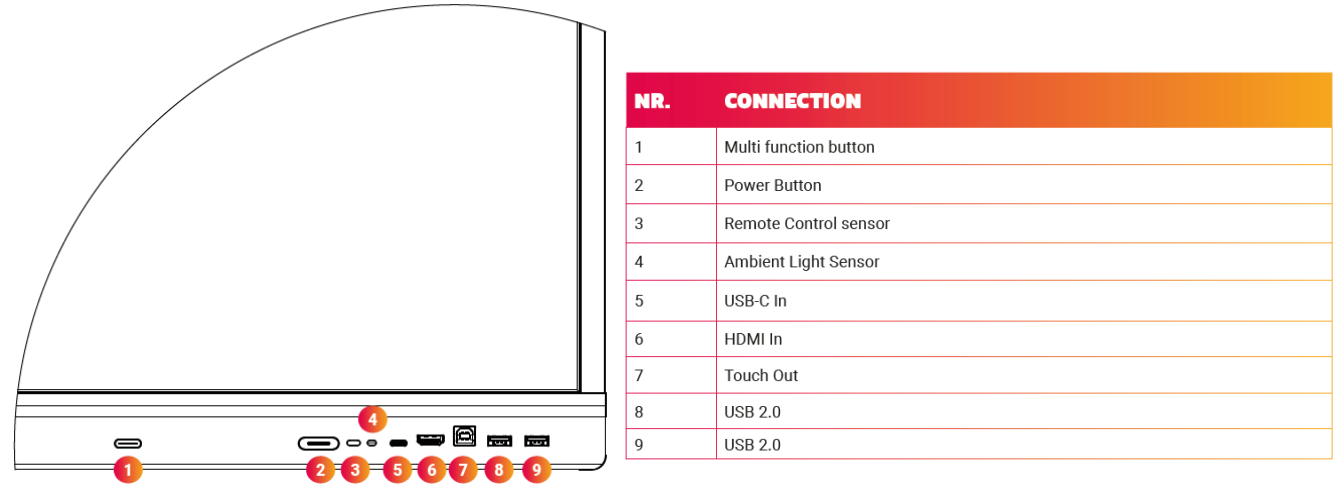
-
The Power LED light will keep on flashing during the update procedure. Just wait patiently (update can take up to 15 minutes).
-
When the update is complete, the display will restart automatically.
-
Wait untill the Installation Wizard is visible on the screen.
-
Follow the steps in the Installation Wizard.
-
After finishing the Installation Wizard, the home screen will appear and the recovery is completed successfully.


What happens during the update
The display will compare the version you are trying to install with the already-installed version. When they are the same, it wont install any firmware update. In some cases, it might be necessary to install another version of the firmware first to achieve your desired installed version.
First, the display will update and when it is finished, the screen will reboot and upgrade MCU automatically. The whole update will take about 15 minutes to complete.