
If your i3CAMERA Pro 4K microphone isn’t working when connected to an i3TOUCH display running Windows or Android, this guide will help you adjust the right settings. This article is for anyone using the i3CAMERA Pro 4K with an i3TOUCH display and experiencing microphone issues. If your camera is not detected at all, or you have video issues, please refer to the camera connection or video troubleshooting articles.
By the end of these steps, your i3CAMERA Pro 4K microphone should work with your chosen operating system. If the microphone still doesn’t work after following these steps, contact i3CONNECT support.
Before you start
-
Make sure your i3CAMERA Pro 4K is connected to a USB 2.0 port on your i3TOUCH display.
Instructions
-
Connect your i3CAMERA Pro 4K to a Windows computer.
-
Open the Windows Camera app to view the camera feed.
-
Use the remote control to open the OSD (On-Screen Display) menu:
-
Press the SETTINGS button.
-
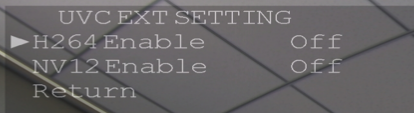
Navigate to UVC EXT SETTINGS.
-
Find the H264 setting.
-
-
Set the H264 option based on your operating system:
-
For Android: Set H264 to Off to enable the microphone.
-
For Windows: Set H264 to On to enable the microphone.
-
-
Unplug and replug the USB cable from the camera to apply the new setting.
Video instructions
Troubleshooting
-
If you access the OSD menu while using the camera in an Android app, the image may appear mirrored, making navigation tricky. Use the Windows Camera app for easier setup.
-
If the microphone still doesn’t work after these steps, try a different USB port or cable.
-
For video issues or if the camera isn’t detected, see the relevant troubleshooting articles or contact support.